A client’s affiliate payouts stopped syncing for eleven days before anyone noticed. Not because the affiliate platform broke. Because the Zapier connection between WooCommerce and the platform had silently hit its monthly task limit, and every order after that just… didn’t fire. Nobody got an error. Nobody got an email. The orders were there. The commissions weren’t.
That’s the failure mode nobody warns you about when they tell you to “just Zapier it.”
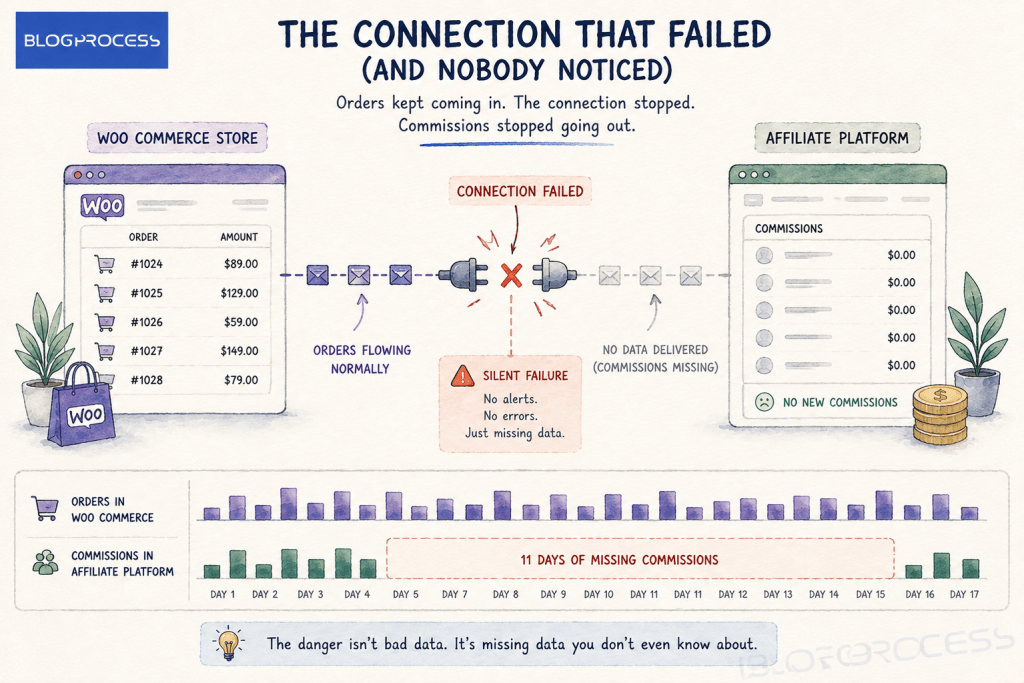
WooCommerce has native webhooks built in. No plugin required, no middleman task limit, no monthly bill that scales with your order volume. Most store owners never touch this setting because it lives three menus deep and looks intimidating. It isn’t. Here’s how it actually works, where it beats Zapier outright, and where it can quietly fail on you too.
What a WooCommerce Webhook Actually Does
A webhook is WooCommerce sending a message the moment something happens, instead of some other tool checking in every few minutes to ask “did anything change yet?” That second approach is called polling, and it’s what most Zapier connections do under the hood even when they feel instant.
The difference matters more than it sounds like it should. Polling means delay, wasted requests, and a task counter ticking up on every single check, whether or not anything actually happened. None of that data changed. A webhook skips all of it, firing once, exactly when the event occurs, straight to whatever URL you point it at.
Setting one up doesn’t touch a line of code. It’s a form.
Where to Set Up Webhooks in WooCommerce
Go to WooCommerce → Settings → Advanced → Webhooks, then Add Webhook. Five fields matter:
- Name: anything readable, this is just for your own dashboard
- Status: Active delivers payload, Paused stops delivery temporarily without deleting the webhook, Disabled means it stopped itself after repeated failures
- Topic: which event triggers the webhook, more on this below
- Delivery URL: the endpoint that receives the data, this is what your affiliate, email, or inventory tool gives you, must be HTTP or HTTPS
- Secret: optional, signs the payload for verification, covered in the code section below
The first time you save a new webhook with Active status, WooCommerce fires a test ping to the delivery URL. That’s your first real signal the connection works, check the delivery log right after saving instead of waiting for a real order to test it.
The Webhook Topics You’ll Actually Use
WooCommerce ships with 15 predefined topics across four resource types: coupons, customers, orders, and products, each supporting created, updated, deleted, and (for orders, products, and coupons) restored events. Order and product topics cover almost everything you need for affiliate, email, and inventory syncing.
| Topic | Fires When | Good For |
|---|---|---|
| Order created | New order placed, any status | Affiliate commission tracking, welcome email triggers |
| Order updated | Status changes, refund, edit | Payout confirmation, cart recovery cancellation |
| Product updated | Stock, price, or details change | Inventory sync across channels |
| Customer created | New account registered | Email list sync, CRM sync |
| Coupon created/updated | Coupon added or edited | Affiliate coupon tracking |
Notice what’s missing. There’s no native “abandoned cart” topic, the same gap covered in our piece on WordPress email automation. Cart abandonment isn’t a WooCommerce order state, it’s the absence of one, so nothing fires until a dedicated plugin starts watching for it.
There’s also an Action topic for advanced use, letting you fire a webhook off any WooCommerce action hook, like woocommerce_add_to_cart, instead of the predefined resource events. Most stores never need it. Skip it unless a specific integration asks for it by name.

A Complete Walkthrough: Your First Working Webhook, Start to Finish
Everything above is reference material. Here’s the actual sequence, using order created as the example, since it’s the one most people set up first.
1. Go to WooCommerce → Settings → Advanced → Webhooks → Add Webhook.
2. Name it something you’ll recognize later. “Order Created, Affiliate Sync” beats “Webhook 1” once you have five of these.
3. Set Status to Active. You’ll test safely before any real data is at risk, this isn’t the dangerous step it sounds like.
4. Set Topic to Order created.
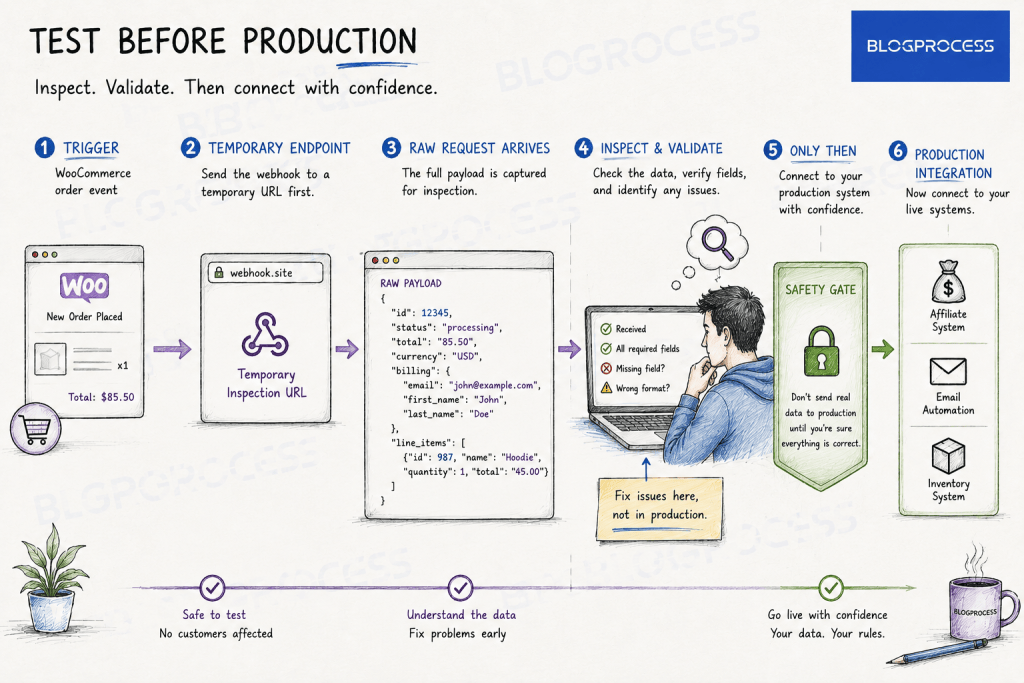
5. Before touching your real integration, open webhook.site in a second tab. It’s a free, publicly available tool built for exactly this, no signup, no install. The moment you land on the page, it generates a unique, temporary URL just for you, think of it as a disposable inbox for HTTP requests instead of email. Anything sent to that URL shows up live on the page: headers, body, timestamp, all of it. Copy that URL. Don’t send real customer payment details through it long-term, it’s for confirming payload structure during testing, not for ongoing production traffic.
6. Paste that temporary URL into Delivery URL and save the webhook. This is the first time it’s being saved as Active, so WooCommerce sends its test ping immediately. Flip back to the webhook.site tab, a request should already be sitting there.
7. Place a real order in your store, or a test order if your payment gateway supports one. Any order works, this is just to trigger the actual order.created event rather than the save-time ping.
8. Refresh webhook.site. A second request appears. Click into it and compare the payload against the sample structure in the code section later in this guide. Confirm the specific fields your affiliate, email, or inventory tool needs are actually present, order total, customer email, line items, whatever that destination requires.
9. If a field is missing, that’s the moment to use the payload filter snippet later in this guide, not after you’ve already wired this into production and started wondering why data isn’t showing up on the other end.
10. Once the payload looks right, get the real delivery URL from your destination tool. Affiliate platforms, email tools, and inventory systems typically show this during their own integration setup screen, look for wording like “webhook endpoint” or “incoming webhook URL.”
11. Edit the webhook, swap the webhook.site URL for the real one, and set a Secret if your destination tool asks for one to verify signatures. Save again.
12. Place one more order and check two places: the delivery log on the webhook’s edit screen in WooCommerce, and the receiving platform’s own dashboard or activity log. Both should show the same order landing at roughly the same moment.
That’s a working sync. Repeat the same twelve steps for order updated, product updated, or customer created, the process doesn’t change, only the topic and the destination do. Steps 5 through 9 are the pattern worth internalizing beyond this one setup: point every new webhook at a disposable endpoint before a production one, always. It catches payloads missing a field you assumed would be there, and delivery URLs that are subtly wrong, a trailing slash or a typo that a live integration might silently swallow instead of erroring on.
Syncing Affiliate Software Through Order Webhooks
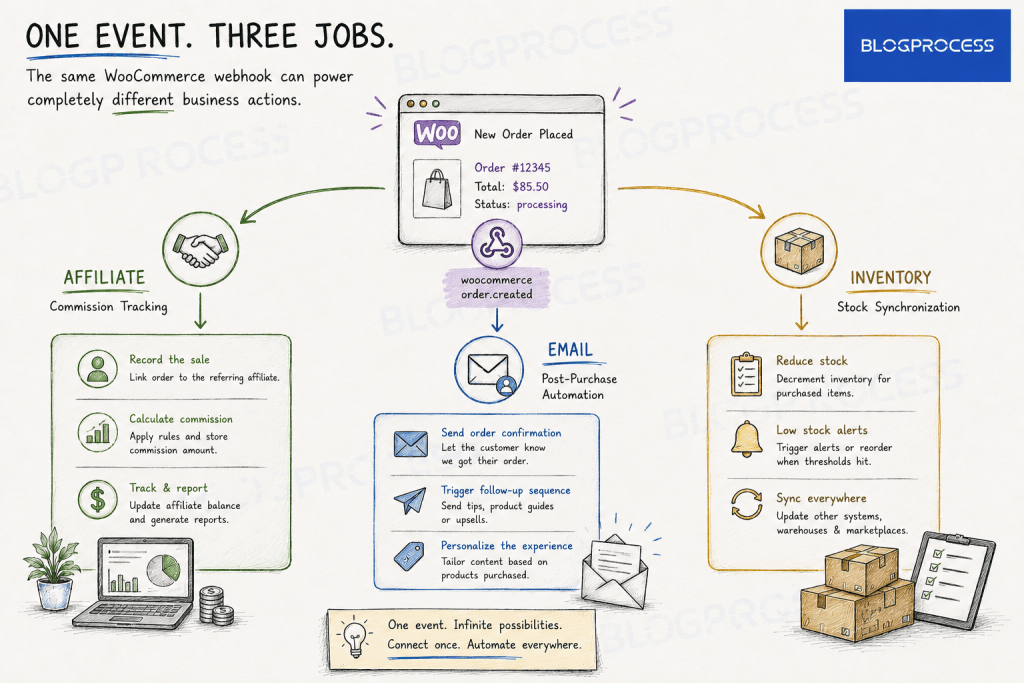
This is the fix for exactly the problem that opened this article. Once you’ve picked a platform using something like the criteria in our affiliate and referral software comparison, most of them give you a webhook-receiving URL during onboarding, built specifically to accept WooCommerce’s order created and order updated payloads.
Point order created at that URL, and the affiliate platform gets the sale, the coupon code used, and the order total the instant checkout completes. No polling delay. No task counter. Point order updated at it too, so refunds and cancellations claw back commissions automatically instead of you catching it manually three weeks later during reconciliation.
One thing trips people up here: the payload only includes what’s actually stored on the order object. Nothing more. If your affiliate tracking depends on a custom field, like which landing page the customer arrived from, that field has to exist on the order before the webhook fires, or the platform receives nothing to match against. There’s a code snippet for adding exactly that in the developer section below.
Syncing Email Tools Through Customer and Order Webhooks
Email platforms want two signals. Conflating them is a common setup mistake. Customer created should feed your list-building tool, the one covered in our email automation and marketing tools roundup. Order created should feed anything transactional, receipts, shipping updates, post-purchase sequences.
Wiring both into the same webhook endpoint works technically, but it makes debugging miserable. Something breaks. Now which flow failed, signup or purchase? Separate endpoints, even pointing at the same platform, keep that diagnosis fast.
Syncing Inventory Without a Middleman Plugin
If you sell the same products across WooCommerce and a second channel, Amazon, Etsy, a physical POS, stock drift is the single most common operational headache. Product updated webhooks solve the direction that matters most: the moment stock changes in WooCommerce, the webhook fires with the new quantity, and whatever’s listening on the other end can update the second channel before someone orders something that’s already gone.
The reverse direction, syncing stock changes from the other channel back into WooCommerce, isn’t something a webhook alone handles, since WooCommerce is the one sending, not receiving, in this setup. That direction needs either the second platform’s own webhook system pointed at a WooCommerce REST API endpoint, or a dedicated multichannel inventory tool. Worth knowing before you assume one webhook covers both directions. It doesn’t. Worth doing at the same time: that same product updated event is also what keeps product schema accurate as stock changes, not just the second sales channel.
Code Examples Worth Keeping
The rest of this guide is no-code. These four snippets are for the moments a no-code tool can’t quite do what you need, drop them in a child theme’s functions.php or a site-specific plugin.
What the headers actually look like. Every delivery includes these, useful when you’re debugging in a testing tool like webhook.site:
| Header | Example Value | What It Tells You |
|---|---|---|
X-WC-Webhook-Topic | order.updated | Which event fired |
X-WC-Webhook-Resource | order | The resource type |
X-WC-Webhook-Event | updated | The specific action |
X-WC-Webhook-Signature | base64-encoded hash | Used to verify authenticity |
X-WC-Webhook-ID | the webhook’s own ID | Which webhook sent it, if you have several |
X-WC-Webhook-Delivery-ID | a unique delivery ID | Use this to catch duplicate deliveries, WooCommerce can retry and send the same event twice |
A trimmed order payload. Real payloads include far more fields, line items, tax lines, shipping lines, meta data, but this is the shape:
{ "id": 4521, "status": "processing", "currency": "USD", "total": "79.99", "customer_id": 118, "date_created": "2026-08-20T14:32:00", "billing": { "first_name": "Jane", "email": "jane@example.com" }, "line_items": [ { "id": 1, "name": "Wireless Mouse", "product_id": 302, "quantity": 1, "total": "79.99" } ]}
Verifying the signature. This is the PHP a developer drops into the receiving endpoint to confirm a payload actually came from your store:
$received_signature = $_SERVER['HTTP_X_WC_WEBHOOK_SIGNATURE'];$payload = file_get_contents('php://input');$secret = 'your-webhook-secret';$expected_signature = base64_encode( hash_hmac('sha256', $payload, $secret, true));if (!hash_equals($expected_signature, $received_signature)) { http_response_code(401); exit('Signature mismatch');}
Adding a custom field to the payload. This is the fix for the landing-page tracking problem mentioned above, it hooks into WooCommerce’s own payload filter to attach data that isn’t there by default:
add_filter('woocommerce_webhook_payload', 'add_landing_page_to_order_webhook', 10, 4);function add_landing_page_to_order_webhook($payload, $resource, $resource_id, $webhook_id) { if ('order' === $resource) { $order = wc_get_order($resource_id); $payload['landing_page'] = $order->get_meta('_landing_page_url'); } return $payload;}
Raising the failure threshold. If your receiving endpoint has occasional hiccups and you don’t want WooCommerce disabling the webhook after 5 failures, this raises it:
add_filter('woocommerce_max_webhook_delivery_failures', function () { return 10;});
When Webhooks Fail Silently
Webhooks don’t announce their own failure the way a crashed plugin does. Here’s where they quietly break, and what actually catches it.
| Failure Point | Why It Happens | How to Catch It |
|---|---|---|
| Auto-disabled after failures | WooCommerce disables a webhook after 5 consecutive failed deliveries, any response that isn’t 2xx, 301, or 302, with no email alert | Check webhook status quarterly, not just delivery logs, a Disabled status is easy to miss |
| Delivery URL changed | Receiving platform migrated or updated its endpoint | Check delivery logs under the webhook’s edit screen monthly |
| Secret mismatch | Secret rotated on one side, not the other | Test payloads fail signature verification silently on the receiving end, always retest after any credential change |
| Server timeout | Receiving server slow to respond, WooCommerce gives up | Delivery log shows failed status, retry manually from that same screen |
| Delayed on low-traffic sites | Delivery runs through Action Scheduler and WP-Cron by default, which only fires on site visits and can lag by minutes to hours during quiet periods | Check WooCommerce → Status → Scheduled Actions for a pending backlog, and switch WP-Cron to a real server cron job if delays are frequent |
| Webhook paused accidentally | Someone toggled status during unrelated settings work | Audit active webhooks quarterly, not just when something breaks |
The delivery log is the part almost nobody checks. Every attempt, success or failure, logs there with the response code and timestamp. Check it first. It’s the first place to look before assuming the receiving platform is at fault. One limit worth knowing: WooCommerce only keeps the 25 most recent delivery logs per webhook, so on a busy store that history can roll over faster than you’d expect. If you need a longer audit trail, log deliveries on the receiving end too, don’t rely on WooCommerce as your only record.
There’s a second place to check when a webhook seems delayed rather than failed: WooCommerce → Status → Scheduled Actions, filtered to woocommerce_deliver_webhook_async. A pile-up of pending actions there confirms the delay is on the delivery side, not the trigger side, before you go chasing the wrong problem.
Webhooks vs. Zapier: When Each One Actually Wins
Native webhooks aren’t automatically the better choice. They’re the better choice for a specific kind of job.
| WooCommerce Webhooks | Zapier | |
|---|---|---|
| Cost at scale | Free, no task metering | Scales with task volume, gets expensive fast |
| Speed | Immediate, no polling delay | Near-immediate on paid tiers, delayed on free |
| Conditional logic | None, sends raw data as-is | Built in, filter and branch before delivery |
| Multi-tool chaining | One webhook, one destination | One trigger can fan out to several apps |
| Setup | Native form, no account needed | Requires a Zapier account and app connections |
Zapier still wins when you need conditional logic before the data lands anywhere, filtering orders by value, formatting a payload differently depending on product category, or chaining three separate tools off one trigger. WooCommerce webhooks send raw data, exactly as WooCommerce structures it. Nothing more. No filtering, no reformatting, no branching. If the receiving tool can’t work with that raw payload as-is, you need something in between translating it, and that’s Zapier’s actual job, not a workaround.
Webhooks win on everything else: volume, cost, and speed. A store doing a few thousand orders a month burns through Zapier’s task allowance fast when every order triggers three or four zaps. That adds up quickly. Native webhooks cost nothing extra and don’t throttle, because WooCommerce itself is sending them, not a third-party service metering how many it’ll process this billing cycle.
Questions People Ask About WooCommerce Webhooks
Do WooCommerce webhooks require a plugin?
No. Webhooks are built into WooCommerce core and live under WooCommerce → Settings → Advanced → Webhooks. No additional plugin is needed to create or manage them.
Why isn’t my WooCommerce webhook firing?
Check the delivery log on that webhook’s edit screen first, and check the Status field too. WooCommerce automatically switches a webhook to Disabled after 5 consecutive failed deliveries, with no email notification, so a webhook that worked for months can go silent without any obvious cause. Beyond that, common culprits are an expired or changed delivery URL, or the receiving server timing out before it can respond.
Can I use one webhook for multiple tools?
Not directly. Each webhook points to a single delivery URL. To notify multiple tools from the same event, either set up a separate webhook per destination, or route through a single endpoint that fans the data out to each tool from there.
What data does a WooCommerce webhook actually send?
The full resource object as JSON, matching what the WooCommerce REST API returns for that resource type. An order webhook sends the complete order object: line items, totals, customer info, and any custom fields stored on that order.
Is the webhook secret required?
No. It’s optional in the setup form, and if you leave it blank, WooCommerce automatically uses the current API user’s consumer secret to sign the payload instead. Setting your own secret is still worth doing so verification isn’t tied to whatever API credentials happen to be active.
Do webhooks work with WooCommerce subscriptions?
Yes. Subscription-related events fire through the same order topics, since a subscription renewal generates a new order. The WooCommerce Subscriptions extension also adds its own dedicated topics, like subscription created and subscription updated, on top of the core set, so pause and cancellation events can trigger separately from the order itself.
Conclusion
Stop routing every WooCommerce event through a tool that charges by the task and delays by design. Set up native webhooks for the high-volume stuff, orders and product updates, and keep Zapier for the handful of workflows that genuinely need conditional logic before the data lands anywhere.
Start with one webhook. Point order created at whichever tool matters most right now, affiliate tracking, email sync, or inventory, and check the delivery log after your next few orders to confirm it’s actually firing. Then check its Status a few weeks later too. That five-minute habit is the difference between catching a broken sync in an afternoon and finding out eleven days later like my client did.