

There is a different kind of ceiling that shows up on shared hosting, and it has nothing to do with server management overhead. It is a performance ceiling. Your site runs fine until a post goes viral or an email blast sends a traffic spike, and then everything slows to a crawl because you are sharing CPU and memory with hundreds of other accounts on the same box.

I hit that wall on ScalaHosting and went looking for something that kept full WordPress control but removed the resource contention. Kinsta fit that gap. Unlike the move to WordPress.com, which trades server access for simplicity, Kinsta is managed hosting, not a managed platform. You still get SSH, staging environments, and full plugin freedom. You are just running on infrastructure built for WordPress specifically instead of a general-purpose shared server.
The fully manual path to migrate WordPress to Kinsta: exporting the database and files directly, transferring them via SFTP, and rebuilding the site on Kinsta’s infrastructure without relying on their automated migration tool.
Why Skip Kinsta’s Free Migration Service?
Kinsta offers a free, done-for-you migration where their team handles the transfer. For most people that is genuinely the easier option.
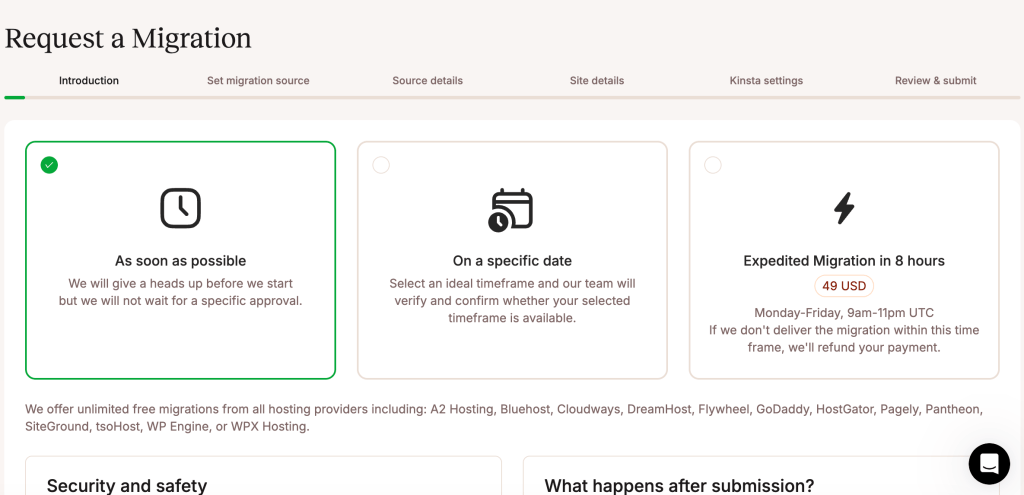
Four situations make the manual Kinsta migration route worth the extra effort instead:
- The source site has a custom setup that an automated tool tends to mishandle, like a heavily modified
wp-config.phpor non-standard file structure - ScalaHosting’s server has restrictions, like disabled remote access or a locked-down file manager, that in most cases will block the automated migration plugin from connecting
- You want to understand exactly what is happening to your data during the move, not hand it to a third party sight unseen
- You are moving several sites over time and want a repeatable process rather than depending on migration-team availability for each one
If none of those apply, Kinsta’s migration team will likely get you there faster. This guide is for the case where manual control matters more than convenience.
Before You Touch Anything: What Changes When You Migrate to Kinsta
Migrating between two self-hosted environments is a fundamentally different operation than moving to a hosted platform. Because Kinsta gives you real server access, you are not limited to a WXR content export. You can move the entire site: files, database, everything, in one pass.
- Everything transfers: posts, pages, media files, plugins, themes, and the full database, all at once
- Server-level rules do not carry over as-is: Kinsta runs Nginx exclusively, which does not read
.htaccessfiles at all, so redirects and rewrite rules need rebuilding through MyKinsta’s built-in Redirect Rules tool - Plugins keep working: anything that worked on ScalaHosting keeps working here, since Kinsta is still just WordPress on a server
- DNS and caching are the two things that bite people: Kinsta’s edge caching behaves differently than whatever ScalaHosting had configured, and needs review before launch
Step 1: Lock Down a Full Backup on ScalaHosting
Same rule as any migration. Never start without a working restore point, even when the move looks routine.
Export the database via SPanel
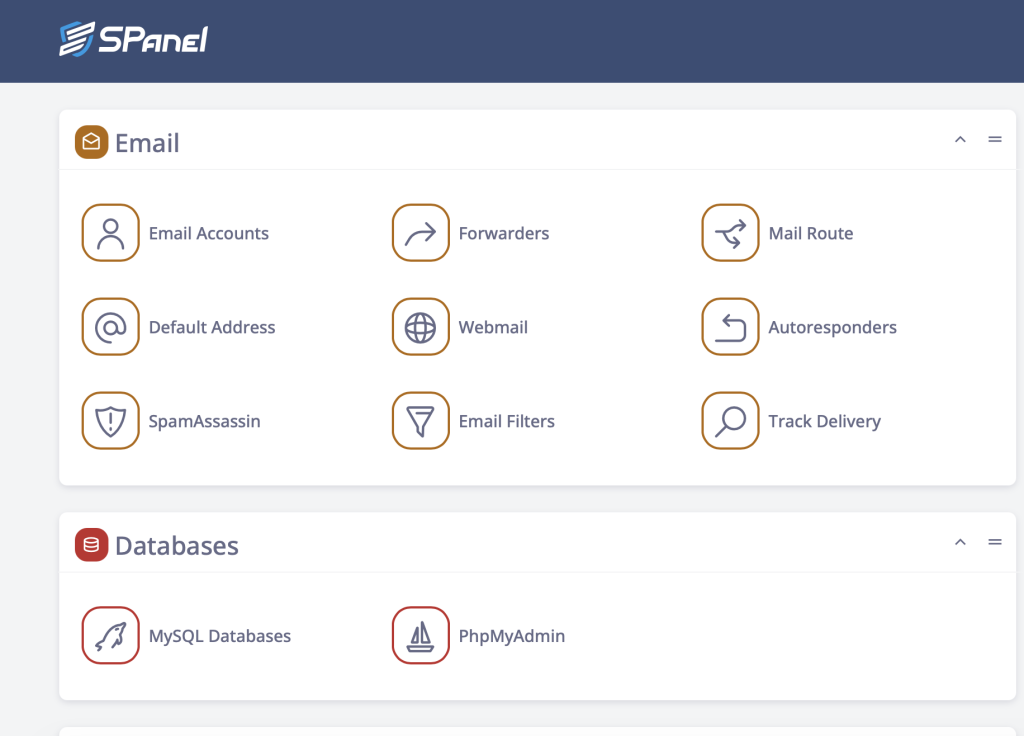
Log into SPanel and open phpMyAdmin from the MySQL Databases section on the homepage.
Select your database from the list on the left.
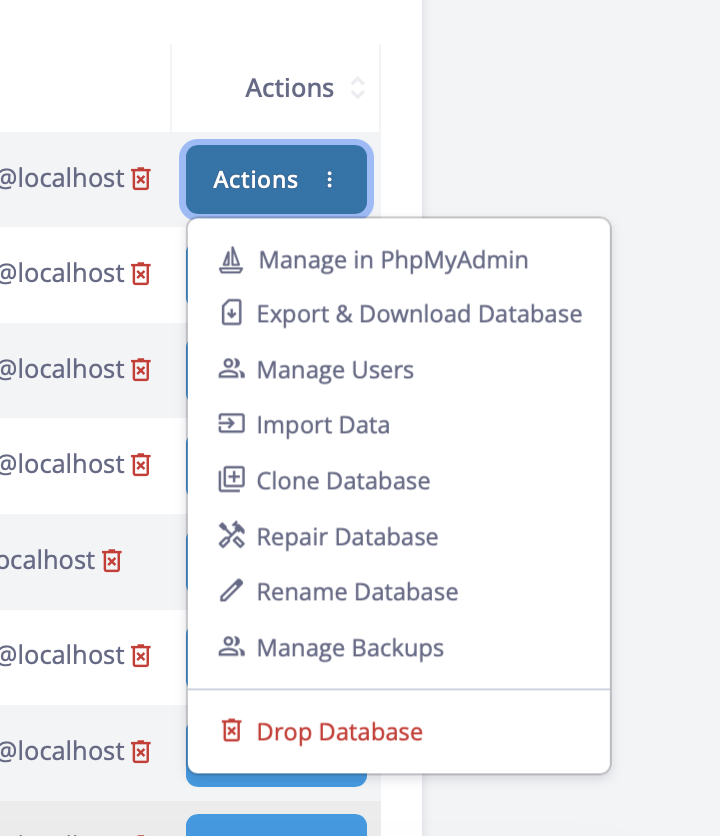
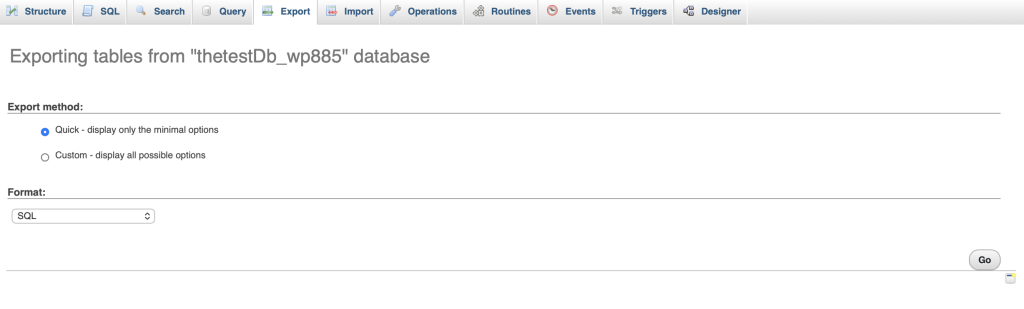
Then click the Export tab, choose Quick as the export method, confirm the format is set to SQL, and click Go. The .sql file downloads immediately.
Download the full file directory
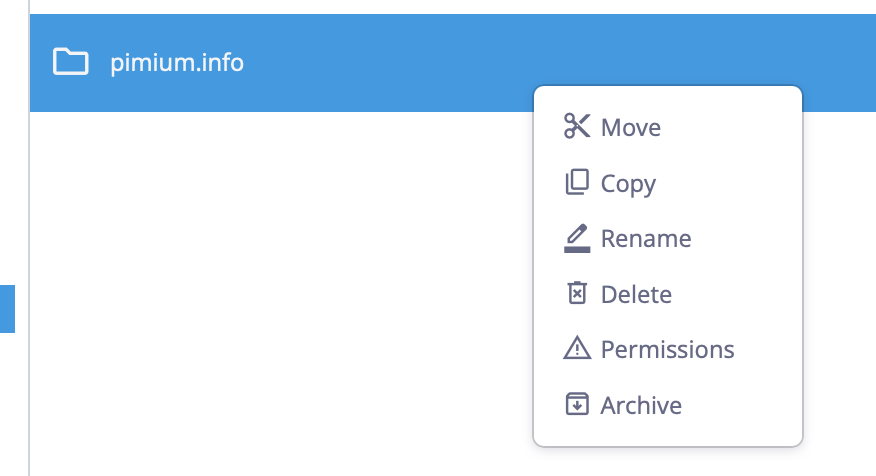
In SPanel File Manager, navigate to your WordPress root. Select the entire directory, right-click, and choose Archive to ZIP everything, then download. For larger installs, SFTP via FileZilla handles this more reliably than the browser-based file manager, especially once the archive climbs past a gigabyte or two.
Step 2: Set Up the Kinsta Destination Site
Log into MyKinsta and click Add site.

Then choose Empty environment rather than the WordPress install option. Kinsta’s own guidance is explicit on this point: since you are bringing your own WordPress files over manually, the destination needs to start with no WordPress installed at all, just the underlying web server, PHP, and MySQL stack, so your uploaded files are not fighting a conflicting install.

Pick a data center close to your primary audience. Kinsta runs on Google Cloud Platform infrastructure, and the region choice affects latency more than most people expect.

Once the site provisions (Which may take up to 15 minutes), Kinsta generates a temporary staging URL in the form of sitename.hosting.kinsta.cloud. This is where the migration actually happens before any DNS changes. Kinsta automatically blocks search engines from indexing this temporary URL, so there is no need to add noindex rules manually before starting.
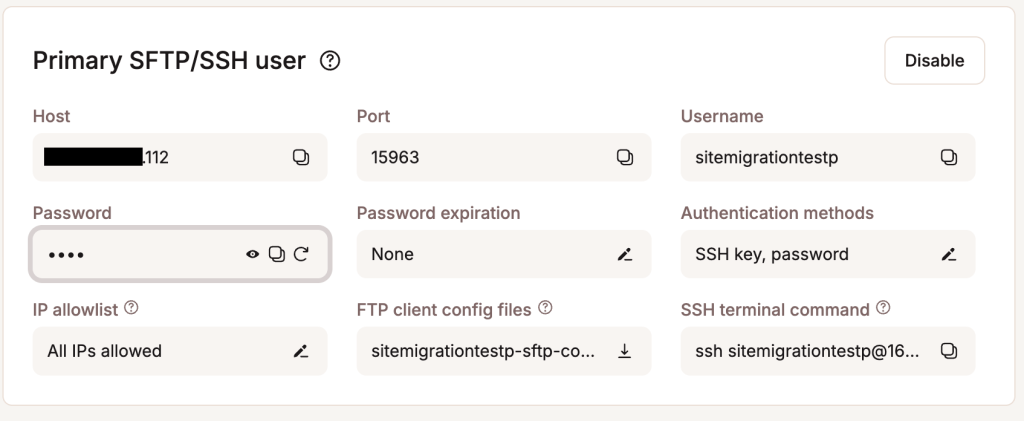
Grab the SFTP and SSH credentials from the Info tab of the new site. You will need both for the next steps.
Step 3: Transfer Files to Kinsta via SFTP
Connect to the temporary Kinsta site using FileZilla or another SFTP client with the credentials from Step 2.
Kinsta’s WordPress root sits under public/, not public_html/, which trips people up on the first pass. Also most tools will require you to add sftp:// before you Host sftp://000.000.000.000

With an empty environment, public/ starts blank, so there are no default WordPress files to clear out first. Upload your full ScalaHosting file archive contents directly into public/. This includes wp-content, wp-admin, wp-includes, and the root-level files like wp-config.php, though the config file itself gets replaced in the next step rather than kept as-is.
For sites with large media libraries, SSH and an rsync or wget pull directly from the old server is faster than dragging files through an SFTP client, provided ScalaHosting’s server allows the outbound connection.
Step 4: Import the Database Into Kinsta
Kinsta provides phpMyAdmin access to each site’s database through MyKinsta under the Info tab.
Click Open database.
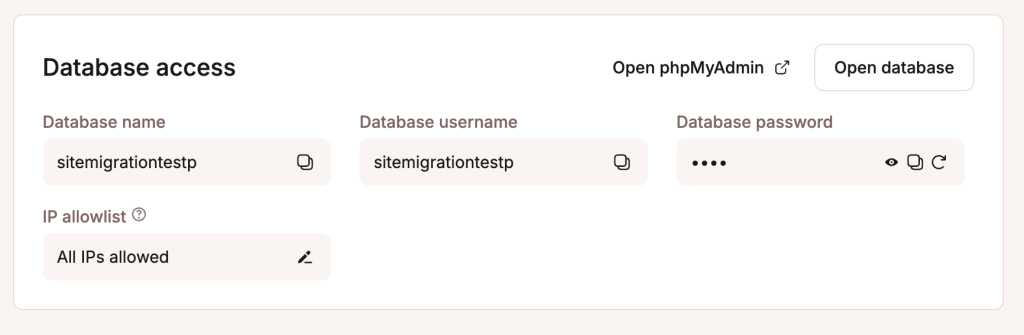
Then click Open phpMyAdmin.
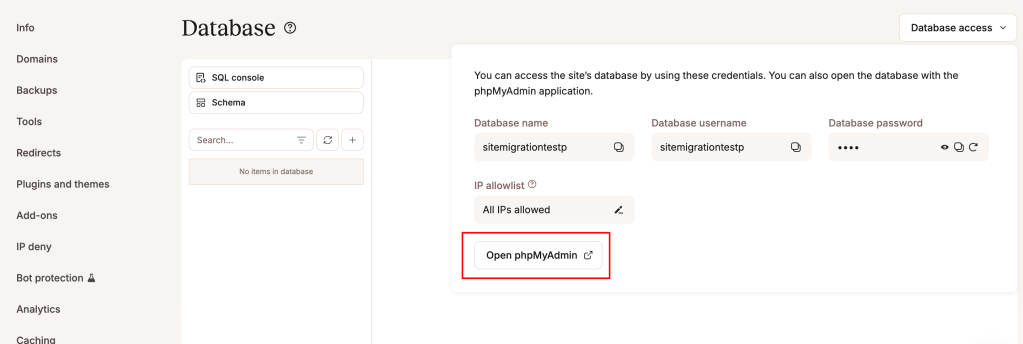
Open it, select the Kinsta-provisioned database, and use the Import function to upload the .sql file exported in Step 1.

Once the import finishes, update wp-config.php on the Kinsta server with the new database name, username, password, and host values, all of which are listed on the same Info tab. The old ScalaHosting credentials will not work here since this is a different database entirely.
| Setting | ScalaHosting Value | Kinsta Value |
|---|---|---|
| DB Host | localhost | Provided in MyKinsta Info tab |
| DB Name | Custom per SPanel setup | Auto-generated by Kinsta |
| DB User | Custom per SPanel setup | Auto-generated by Kinsta |
| Table Prefix | Usually wp_ unless changed | Must match the imported database exactly |
Step 5: Fix the Domain References for the Kinsta Migration
This is the step that trips up most manual migrations. Your database still contains the old domain in wp_options, in post content, and scattered through any serialized data from plugins like page builders. A plain find-and-replace in phpMyAdmin will corrupt serialized arrays, so this needs a tool that understands PHP serialization.
Kinsta includes WP-CLI on every plan. SSH into the site and run the search-replace command against the temporary staging URL first, before touching DNS:
wp search-replace 'https://yourdomain.com' 'https://sitename.kinsta.cloud'--all-tables --precise
Run it a second time after DNS cutover to swap the staging URL back to the live domain. Always run with --dry-run appended first to preview affected rows before committing the change. MyKinsta also includes a built-in search-and-replace option when you add a domain under the Domains tab, which works as a simpler alternative to the WP-CLI method if you would rather not touch SSH at all.
Step 6: Verify the Site on the Kinsta Staging URL
Before anything touches DNS, load the sitename.kinsta.cloud address and check the site end to end.
- Homepage renders without errors
- Media files display correctly, since these come along with the file transfer rather than needing separate recovery like a WXR-only import
- Plugins are active and functioning, particularly anything with license keys tied to the domain
- Forms submit and email notifications send correctly
- Login works with the original WordPress admin credentials
- Search functionality returns expected results, since some search plugins index by absolute URL and need a refresh after the domain swap
Anything broken at this stage is easier to fix before the domain is live than after.
Step 7: Point the Domain to Kinsta
Inside MyKinsta, go to the site’s Domains tab and add your domain and click Add domain.
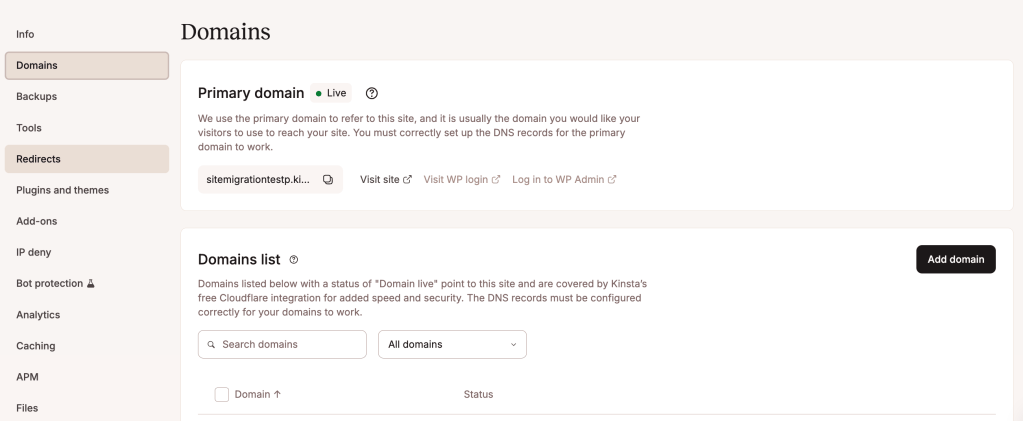
Type your domain and choose Quick setup.
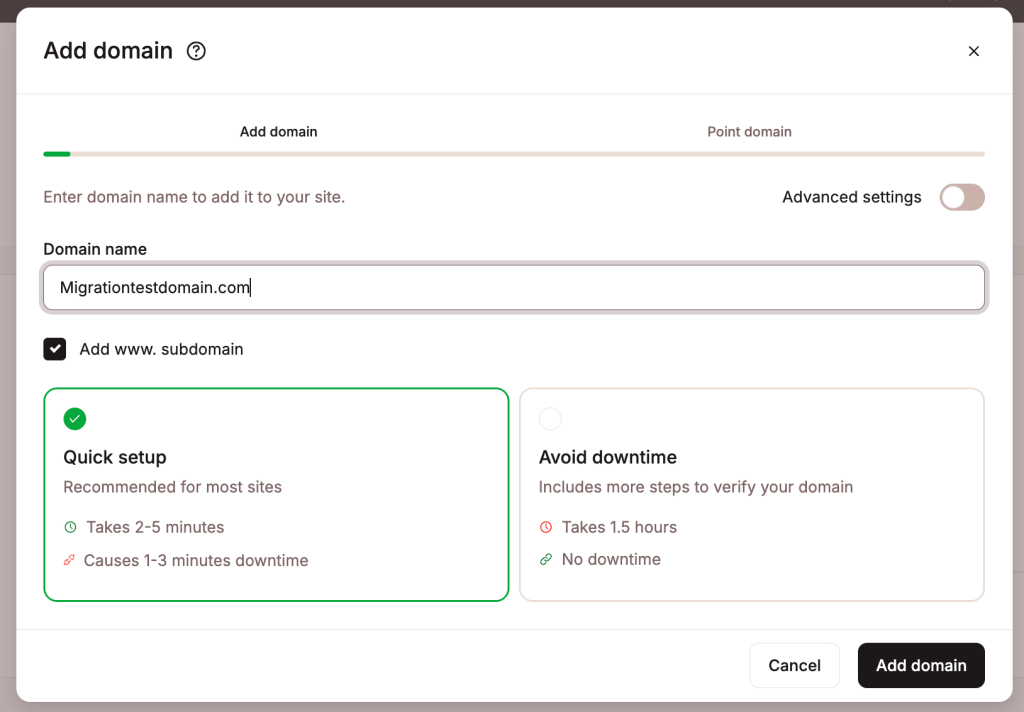
Kinsta gives you the specific A record and CNAME values needed, which vary slightly depending on whether you are pointing the root domain or a subdomain.
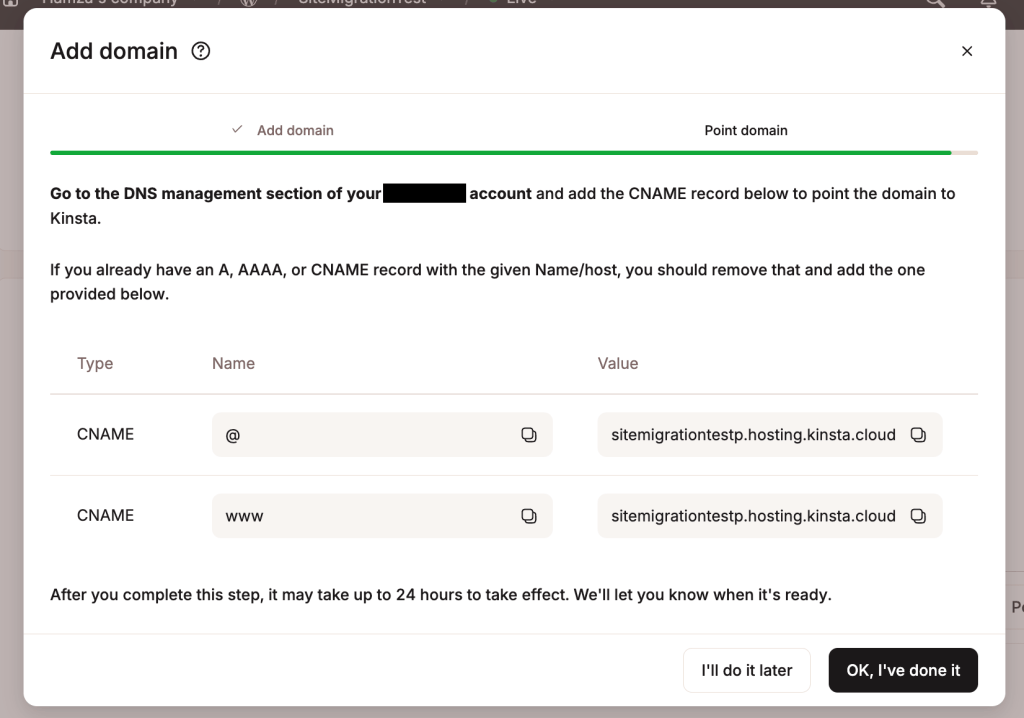
Update those records at your domain registrar or wherever DNS is currently managed. Then go back to Kinsta and click OK, I’ve done it.
Kinsta does not require a full nameserver handoff the way some platforms do, so you can update individual records and keep DNS management wherever it currently lives.
Propagation typically completes within a few hours, though it can stretch longer depending on the TTL values set on the old records.
Step 8: Run the Second Search-Replace Pass on Kinsta
Once DNS has propagated and the live domain resolves to Kinsta, SSH back in and reverse the search-replace from Step 5:
wp search-replace 'https://sitename.kinsta.cloud' 'https://yourdomain.com' --all-tables --precise
Confirm the site loads correctly on the actual domain afterward. This is also the point to run through the site for broken internal links left over from the domain swap, since links hardcoded in post content rather than using relative paths can slip through the search-replace if the old URL format was inconsistent.
Step 9: Final Verification Checklist Before Leaving ScalaHosting
Run through this before cancelling anything on ScalaHosting.
- HTTPS active and forcing correctly, since Kinsta provisions SSL automatically once the domain resolves
- No mixed-content warnings from leftover HTTP references
- Edge Caching turned on and working, since Kinsta automatically enables this for sites created through its own WordPress installer but not necessarily for a site built from an empty environment, so it is worth confirming under Caching in MyKinsta rather than assuming it is active
- Cron jobs firing, since WordPress cron behaves differently under Kinsta’s recommended server-side cron configuration
- Staging environment created for future changes, since this is one of Kinsta’s core advantages over shared hosting
- Backups scheduled and running, since Kinsta’s automated backup system needs at least one full cycle to confirm before you can rely on it
Step 10: Wind Down ScalaHosting
Keep the ScalaHosting account active for two to three weeks after the migration completes. That window covers anything that surfaces after real traffic hits the new environment, things that rarely show up in a quick verification pass.
When ready to close the account, log into the ScalaHosting client portal, locate the hosting subscription, and submit a cancellation request.
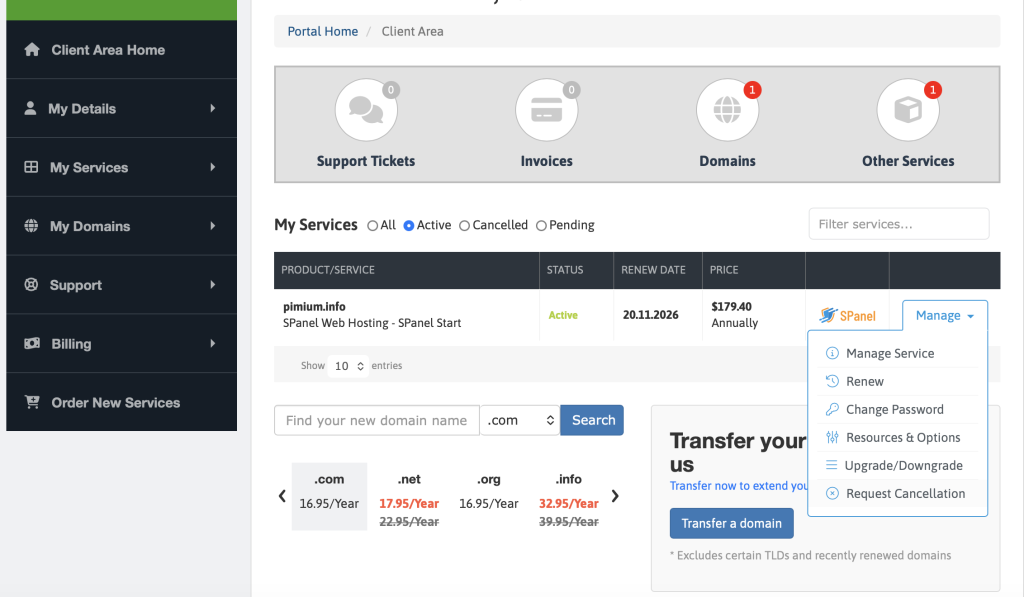
Make sure no payment method is still attached to your scalahosting account.
The Failures That May Happen When You Migrate to Kinsta
| Issue | Cause | Fix |
|---|---|---|
| Site loads with broken styling | Search-replace missed serialized theme options | Re-run wp search-replace with --all-tables, not just wp_options |
| 500 error after file upload | PHP version mismatch between ScalaHosting and Kinsta | Set the correct PHP version under MyKinsta’s Tools tab |
| Emails stop sending | SMTP plugin still pointed at old server settings | Reconfigure the mail plugin with Kinsta’s recommended SMTP setup |
| Permalinks return 404 on inner pages | Rewrite rules weren’t flushed after the domain and file move | Go to Settings > Permalinks in WP Admin and click Save Changes without altering the structure |
| Cron jobs firing twice | Both WordPress cron and server-side cron active simultaneously | Disable WP-Cron in wp-config.php and rely on Kinsta’s system cron only |
Not every issue on this list shows up on every migration, and most of these resolve in under thirty minutes once the cause is identified.
What Actually Changes After Moving to Kinsta
| Factor | ScalaHosting | Kinsta |
|---|---|---|
| Server access | Full cPanel-style SPanel access | SSH and SFTP, no cPanel equivalent |
| Resource isolation | Shared CPU and memory pool | Isolated container per site |
| Staging environments | Manual setup required | One-click staging built in |
| Pricing model | Flat monthly regardless of traffic | Scales with visit count |
| Support | 24/7 live chat and tickets, general server support | 24/7 live chat with WordPress-specific engineers |
The trade-off worth understanding before committing is the pricing model. Kinsta bills by visit count, which means a traffic spike that would have just slowed down a shared server can push you into a higher tier here. For anyone running multiple client sites on shared infrastructure, that math needs to be run per site rather than assumed. If a fully managed alternative built by WordPress’s own creators is also on your shortlist, Pressable is worth comparing before committing either way. Our full roundup of the best Pressable alternatives lines Kinsta up against WordPress.com, WP Engine, and Cloudways too, if you want the wider field before deciding.
For a single, growing blog that outgrew shared hosting’s resource limits without wanting to give up plugin freedom or server access entirely, this is the migration that solves that specific problem. Get started on Kinsta if the resource ceiling on shared hosting is the thing actually holding your site back.
Questions People Ask About Migrating WordPress to Kinsta
Does Kinsta support the same plugins that worked on ScalaHosting? Yes. Kinsta is standard WordPress running on managed infrastructure, so plugin compatibility is not affected by the host itself. The exceptions are plugins that specifically require server-level access Kinsta does not expose, like certain caching plugins that conflict with Kinsta’s built-in edge caching.
Can I use Kinsta’s free migration instead of doing this manually? Yes, and for most sites it is the faster option. The manual route matters when the source server blocks remote migration tools or when a custom setup needs more direct handling than an automated plugin provides.
Will my SEO rankings drop after switching hosts? Not if the domain stays the same and redirects are unnecessary, which is the case here since files and content move as-is. A temporary ranking fluctuation from a crawl of the new server’s response times is possible but typically resolves within a couple of weeks.
Does Kinsta use cPanel? No. Kinsta manages sites through MyKinsta, its own dashboard, rather than cPanel or a similar control panel. Site management, staging, backups, and domain settings all happen there instead.
What happens to my email if it was hosted through ScalaHosting? Email is unaffected as long as it runs through separate MX records rather than the hosting account itself. Since this migration only changes A and CNAME records for the website, existing email routing continues working unless you specifically change the MX records too. For a full breakdown of what each record actually controls, this guide to email DNS records covers it in depth.
How long does the actual downtime last during cutover? With the staging-first approach in this guide, there is effectively no downtime. The live domain keeps pointing to ScalaHosting until DNS propagation completes, so visitors never hit a broken or half-migrated site during the transfer.
Conclusion
Moving from ScalaHosting to Kinsta is not a hard decision. This path keeps every piece of server-level control while removing the shared-resource ceiling that shows up the moment a site starts getting real traffic.
The manual route takes longer than Kinsta’s built-in migration tool, but it gives full visibility into exactly what moved and what needs a second look before the domain goes live.